In the realm of gymnastics and acrobatics, the back handspring stands as a captivating maneuver that combines grace, strength, and precision. But embarking on the journey to master this iconic skill begs a burning question: how long does it take to conquer the back handspring?

Image: www.youtube.com
Navigating this acrobatic endeavor is a highly individualized experience, influenced by factors such as athletic ability, practice regimen, and prior training. Nonetheless, establishing a realistic timeline and understanding the progressive steps involved can accelerate your path to success.
The Timeframe Dilemma: Unraveling the Variables
The time it takes to execute a flawless back handspring relies on a dynamic interplay of factors. Aspiring gymnasts with strong athletic foundations, such as proficiency in handstands and cartwheels, may witness swifter progress.
Additionally, the frequency and consistency of practice play a pivotal role. Dedicate a substantial amount of time to honing your technique, incorporating regular practice sessions into your routine. By embracing a disciplined approach, you expedite the learning process and refine your skills.
Deconstructing the Back Handspring: A Step-by-Step Guide
Mastering the back handspring unfolds as a series of meticulously executed steps:
- StartPosition: Begin by standing tall with your feet shoulder-width apart and your arms raised overhead.
- Cartwheel Preparation: Lower your head and hands to the ground while simultaneously swinging your legs forward. This motion initiates the cartwheel phase.
- Cartwheel: Push off with your hands to complete the forward rotation, landing on your feet with your body facing the opposite direction.
- Handstand: Transition into a handstand by springing up with your arms extended and your legs perpendicular to the ground.
- Back Flip: While in the handstand, bend your knees and snap your hips backwards, initiating the back flip motion. Extend your legs and arms to finalize the back flip.
- Landing: Flex your knees and step forward with one foot to absorb the impact of the landing, maintaining balance.
Initially, breaking down the back handspring into smaller, manageable segments facilitates the learning process. Gradually connect these steps until you can seamlessly execute the entire sequence.
Tips and Expert Advice for Success
As you embark on your back handspring journey, consider these valuable tips and expert advice:
- Seek Guidance: Enlist the assistance of a qualified gymnastics coach or instructor. Professional guidance ensures adherence to proper form and technique, minimizing the risk of injury.
- Focus on Form: Intricacies of form are paramount. Each step of the back handspring should be executed with precision, maintaining a straight body line and proper alignment.
- Practice Regularly: Consistency is key. Incorporate frequent practice sessions into your routine to refine your technique and develop muscle memory.
- Listen to Your Body: Pay attention to your physical cues. Rest when necessary to avoid exhaustion and potential injuries.
- Break it Down: Approach the back handspring in manageable segments. Break down the full sequence and focus on mastering each step individually.
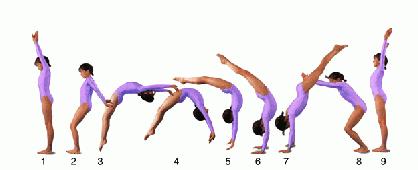
Image: backhandspringhow2.blogspot.com
Frequently Asked Questions (FAQs)
Q: How long does it typically take to master the back handspring?
A: The timeframe varies depending on individual factors, but with dedicated practice, you may achieve proficiency within a few months to a year.
Q: Is it possible to self-teach the back handspring?
A: While it is not advisable to attempt to master the back handspring entirely on your own, a combination of self-practice and guided instruction can be effective.
Q: What are some common mistakes to avoid while learning the back handspring?
A: Rushing through the steps, inadequate warm-up, and improper form can impede your progress and increase the risk of injury.
Q: What are the benefits of mastering the back handspring?
A: Beyond the aesthetic appeal, the back handspring enhances strength, coordination, and confidence.
How Long Does It Take To Get A Back Handspring
Conclusion: Embracing the Journey
Mastering the back handspring is a journey of perseverance, dedication, and self-discovery. While the timeframe may vary, embracing the process and adhering to these guidelines will propel you towards success.
Remember, the true essence of this endeavor lies in the pursuit itself. Embrace the journey, celebrate your progress, and let the back handspring be a testament to your strength, adaptability, and passion for the art of gymnastics.
Are you ready to embark on your back handspring adventure? Share your thoughts and aspirations in the comments section below.


